The Check Register Upload tab is a feature that permits the uploading of CSV files to the Munetrix database. The tab color is shaded blue indicating that the public does not see this tab.
![]() For more
information about uploading CSV files to the Open Checkbook app watch the short
video: Uploading Dynamic Check Registers.
For more
information about uploading CSV files to the Open Checkbook app watch the short
video: Uploading Dynamic Check Registers.
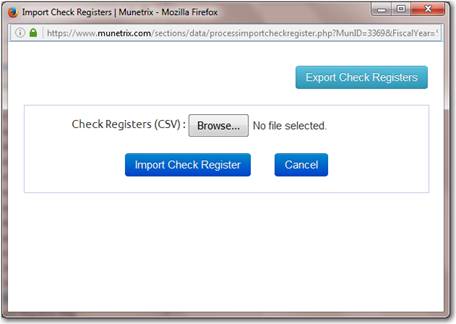
The best method of making sure the CSV file is acceptable is to download a template. Use the “Export Check Registers” button to create a CSV file with the proper number of columns and column names.
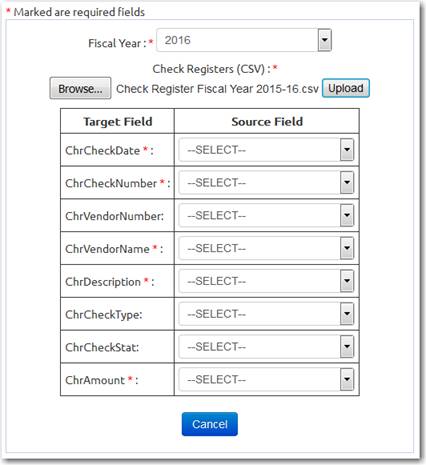
Figure 68: Sample Check Register field mapping screen
The actual upload process requires five steps:
1. In the drop down select the “Fiscal Year” that represents the data in the CSV file.
2. Click the “Browse” button to select the CSV file.
3. Click the “Upload” button to open the field mapping dialog box.
4. For each required field select the column from your CSV field that rwepresents that data being imported.
5. Click the “Import Check Register button”.
|
Field Name |
Field Label |
Use |
Description |
|
ChrCheckDate |
Check Date |
Required |
mm/dd/yyyy |
|
ChrCheckNumber |
Check Number |
Required |
|
|
ChrVendorNumber |
Vendor Number |
Optional |
|
|
ChrVendorName |
Vendor Name |
Required |
|
|
ChrDescription |
Description |
Optional |
|
|
ChrCheckType |
Check Type |
Optional |
Like EFT, Paper, etc. |
|
ChrCheckStat |
Check Stat |
Optional |
Like Printed, Void, etc. |
|
CharAmount |
Amount |
Required |
|
Important notes regarding the importing of a CSV Check Register:
•Must be a CSV file format
•Will overwrite all existing checks for the fiscal year selected
•Be careful that the description output field is long enough so the export does not wrap a blank row in the CSV file
Uploading checks monthly versus year end:
Let’s assume you have a June Year End
1. 1st of August upload the July checks
2. 1st of September upload the July & August checks
3. 1st of October upload July – September checks
4. And so on…
The upload will replace any records existing for the same Fiscal Year being uploaded.