The Capital Project Listing grid is a table showing all the projects with filters to help limit the list that is visible.
As a user, you have considerable flexibility as to what you define a a project. For example, you may create a project titled, “Technology Upgrades”, and then assign tasks and costs to multiple buildings or locations with the same project. On the other hand, you may create a sinlge project for a specific building and include tasks and costs that may include technology, building improvements, vehicles, etc.
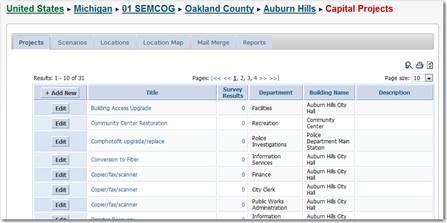
Figure 56: Listing of projects in the Capital Improvement Plan Manager
Project Type: is a method of categorizing your projects into a standard list of asset types. By default a new project is listed with a Project Type of “Not Identified”. You will have the ability to print Cost reports grouped by Project Type.
Priority: it is recommended, and in some cases required, to identify a method of prioritizing your projects. The Munetrix CIP app includes two methods; the Priority field and the Survey tool. The Priority method is a simple dropdown field to indeitify projects on a 1 to 5 scale. You will have the ability to print Cost reports grouped by Priority. For more information on the Survey tool see, Survey Listing.
Default Building: this is used to store the default location for a specific project. When entering project cost detail you, will be asked for a Building or Location. At that time, the dropdown list will default to the Building or Location that was entered as the Default Building when the project was created. The Building or Location must have been previously added. Buildings can be managed using the Locations tab within the CIP or using the Buildings Manager App. For more information see, Buildings / Locations Manager.
Fund: this is used to store the default Fund for a specific project. When entering project cost detail, you will be asked for a Fund. At that time, the Fund will default to the Fund that was entered as the Default Fund when the project was created. The Fund must have been previously added using the Chart of Accounts Manager App. For more information see, Chart of Accounts Manager.
Department: this is used to store the default Department/Cost Center for a specific project. When entering project cost detail, you will be asked for a Department. At that time, the Department will default to the Department that was entered as the Default Department when the project was created. The Department must have been previously added using the Chart of Accounts Manager App. The Expenditure Codes and Name entered in the Chart of Accounts becomes the Departments for the CIP. For more information see, Chart of Accounts Manager.
Funding Source: is an optional text field that identifies the source of funds for a specific project. Examples might be General Fund, Special Millage, Revenue Backed, etc.
Local Unit Share: this is an optional field to store whether the local unit is providing the funds for a specific project or the existence of other partners is contributing to the funding.
Internal Number: this is an optional field to store internal numbers used to idnetify projects.
Description: this is an optional field to store long text description of the porject.
Impacts: this is an optional field to store long text describing the impacts of the project.
Image: you have the ability to upload an image associated with each project. These images will appear on the Project Detail report and the Public Report. You must first click the Browse button to identify the image file and then the “[Upload]” link to complete the upload. You must also click the “Update” button to save the record with the image.